Posted on

Eyebrows

By: Vera Tovshteyn

The physical function of eyebrows is to prevent dirt and moisture, such as sweat,
from getting into our eyes. The aesthetic function, however, is to bring focus to
our eyes and to frame the face. Our cheekbones provide the lower frame, while the
eyebrows provide the upper frame to our eyes, making them the focal point of the
face. The shape and position of the eyebrows can alter our facial expression and the
way others perceive us.

As my former makeup instructor, Merideth, always said, “You wouldn’t put a Mona
Lisa in a poorly constructed frame, or one that is the wrong size for the painting.”
Having been fortunate to see the Mona Lisa this past summer, I thought that the
frame was just a bit distracting from the unexpectedly small masterpiece. But of
course, this is just an opinion. Examining further, I could not help but think that the
lack of visible brows attribute to the “mysteriousness” of her expression. Her point
was that no matter how well the makeup is applied, the eyebrows play a major role
in how your face looks, overall.

As far as perfect eyebrows go, one word that can describe them is “balanced”.
A woman whose eyebrows are too high appears to be surprised all the time.
Eyebrows that are too low give an illusion of sadness. If they are too arched, with
the inner brow that is very low, then a woman will have an angry expression. Too
thin – takes attention away from the eyes. Too heavy – distracting. And, finally, too
perfect – UNNATURAL!

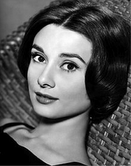
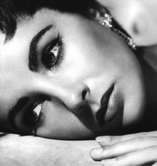
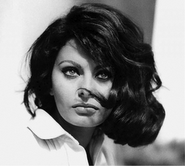
The classic eyebrow shape is the one made famous by the Hollywood stars of the
1950’s, such as Audrey Hepburn, Elizabeth Taylor, and Sophia Loren. All of them
proudly wore quite a strong, arched brow. While Hepburn and Loren’s brows were
not overpowering, Taylor’s black-filled brows were a part of her signature look.

The classic brow is considered to complement most people, which is the reason it
is “classic”. Think of it as a well-fitting black dress; when in doubt – that is what
you wear. However, one size and shape, obviously does not fit all! There are some
variations of the classic brow, which will flatter a woman’s face, depending on the
structure of its features. Below, I offer several tips on adjusting the classic brow
shape for your face:

1. Normally, a classic brow begins above the tear duct, or the inner corner
of your eye. If you have close-set eyes, make them appear wider apart by
slightly widening the distance between the brows (slightly is the key word
here). Either leave it to a professional aesthetician or pluck them yourself.
If choosing the latter, I suggest making marks with a pencil first, to ensure
symmetry.

2. Conversely, to visually narrow the space between the eyes, reduce the
distance between the eyebrows by slightly filling them in with an eye shadow
or an eyebrow pencil. The most natural way to fill in brows is by using very
thin, light strokes, as if you are drawing hair. You may want to practice
drawing hair on paper first.

3. The highest point of the arch is approximately above the outer edge of the
iris, when you are looking straight ahead. This too may vary slightly, but
usually only in the outer direction. I do not advise making the arch closer to
the center of the eye, or you will risk a clown or joker-like appearance.

4. It may seem obvious, but, just in case… if your face is small, you can keep the
shape but reduce the thickness, while someone with a larger face can carry
a stronger brow. The size of your eyes should also serve as a guide for how
thick or thin your eyebrows should be.

5. A curvy arch will look more flattering on ladies whose features are more
angular.

6. If your eyebrows are naturally very sparse or light, use the fill-in technique
described above. Always use light, feathery strokes in the same direction
as the hair growth. When filling the inner (thicker) half of the brow, your
strokes should be more vertical. As you reach the outer half (thinner), the
hair begins to grow horizontally. Consequently, your strokes should become
shorter and flatter as well.

7. When filling in brows, you have several product options. My favorite is an
eye shadow with a small, flat angled brush that I moisten with water. Another
option is an eyeliner pencil. In order to achieve natural looking eyebrows,
use a color that is a shade lighter than the hair (I actually like to use two
shades to give them a three-dimensional quality). Use neutral colors, such
as shades of beige and taupe that do not have any red pigment, as our brows
almost never have a red pigment in them. Many makeup companies carry
pencils and powders specifically designed for this purpose, in wide array of
neutral shades.

8. Brow gel is a product that may be useful to those with thicker or difficult-
to-manage eyebrows. The wand, which is just like the mascara wand, is for
brushing through and directing the hair in the desired direction. The gel that
keeps the hair in place can be colorless or tinted.

Although we should aim to make our eyebrows as even as possible, we also have
to consider the shape of the eyes, and the overall shape of the face. Sometimes the
two sides of the face are not exactly symmetrical, and that is where another one of
Merideth’s brilliant quotes comes in: “They’re not twins; they’re sisters!”

eyebrows picsdownloaddownload (1)

Vera is a certified makeup artist based in New York. A graduate of a protégées Make Up Designory school (MUD). Vera has all of the necessary skills and tools to create an unique and fresh look for any occasion. Vera’s ability to realize the client’s vision, re-create a look from a photograph or film, or develop a unique look, camouflaging imperfections while enhancing the natural beauty is truly unsurpassed.

Posted on

Shavuot Makeup – Long Lasting

With Yom Tov coming up, I decided to share with you a beautiful makeup look along with a few tips on how to keep your makeup lasting as long as possible.

PesachMakup1

The look I have for you is a neutral look that will match any outfit you decide to wear. To prevent the eye makeup from rubbing off over night, do your best to sleep on your back. That way, it won’t rub off onto your pillow. In addition, using a good primer (as mentioned in step #1) will help the makeup last. However, even if most of the makeup does come off over night, you will be left with the black eyeliner for the next day.

PesachMakeup2

  1. Prime your eyes: You want to use a really good primer so that your makeup has the best chance at staying on overnight. I used Maybelline Fit Me Concealer, and although it is not meant to be used as an eye primer, I find that it works really well. Use your ring finger to lightly pat the concealer all around the eye area- both on the eyelids and under them. Set your eyes with some foundation powder to prevent creasing.
  2. Apply gold eye shadow to the center of your eyelids. Instead of sweeping it on, pat it on with your fingers or a brush. This will pack the eye shadow on better, making it last longer.
  3. Apply a shimmery light eye shadow on the inner corners of the eyes to brighten them up.
  4. Apply black eye shadow on the outer corner of the eye.
  5. Apply a light natural powder (I use regular foundation powder) and apply it on the brow bone, blending it well into the crease.
  6. Use the same black eye shadow and line it under your eyes using a small eyeliner brush.
  7. Apply black eyeliner. If you want the best chance at having the eyeliner last for a day or two, here’s what I recommend: A) Use gel eyeliner and apply it with a small eye shadow brush. A good option is Maybelline Eye Studio Gel Liner. The second best option is to apply liquid eyeliner, but I find the gel works better and lasts longer. B) Set the eyeliner with black eye shadow.
  8. Apply some mascara to complete the look.

PesachMakeup3

For the rest of the face, I suggest not applying any foundation whatsoever, because going to sleep with makeup on your face is really bad for your skin. Therefore, I will move on to the lips.

Apply a long lasting lipstick. The lipstick I used is Revlon ColorStay Overtime Lipcolor, and be warned: This lip product is very hard to remove even after wearing for an entire day. It really lasts very well.

Here is the completed look:

PesachMakeup4

Happy Shavuot!

Posted on

Back to the Basics: Skin Care

There are countless beauty products out there, and I get asked all the time which products are great and work well for different skin types. My answer is always the same: Whenever your skin isn’t ‘working’, and breaks out badly or just starts acting crazy, go back to the basics. It’s hard to tell whether you have oily or dry skin when it’s always covered in products. Very often, the products you buy claim to be the miracle cure when they aren’t, and in fact, could be doing more damage than good.

SkinCare

1) Elimination: The first step is to completely stop using everything, and start from the beginning. Use lukewarm water in the morning and at night to cleanse your face and do not apply any makeup whatsoever. Let your skin breathe for a few days. Sometimes, this is all your skin needs and will clear up on its own just like that.

Now that your skin is aux-natural, you can figure out exactly what facial care your skin needs. Study your face in the mirror. See if your skin is dry and flaky or shiny and oily or a combination of the two. Once you figure that out, throw away all the products you have that are not meant for your skin type.

2) Cleanse: There is no need to go out and buy yet another cleanser; you most likely have something that will work perfectly. Try and pick one that is not too expensive, I find that the fancier products have a lot more chemical type stuff in there that you don’t want on your face. In addition, most of those expensive products are actual dupes for something cheaper. Use this cleanser every night. If you go to bed with a clean face, all you need is a splash of lukewarm water in the morning to cleanse your face.

My suggestion: Cetaphil has a great cleanser, and they have different ones for all skin types. It is also gentle enough to use both in the morning and night if you want to.

3) Toner: This is not a necessary step in your skin care routine unless your skin is very oily. I skip this step completely because my skin is more on the dry side.

My suggestion: Witch Hazel is something you can pick up from your local pharmacy. Use a cotton pad to apply it to your face. Use it sparingly and only if you have very oily skin.
An alternative idea is to buy a cleansing water to use after you cleanse your face. Bioderma is a great one you can buy off Amazon.com.

4) Moisturize: This is one of the most important steps in a skin care routine, even if your skin is oily. Do it at least every night. Almost any moisturizer will do. If you are worried about your skin becoming too oily, apply it with a sponge or very clean fingers. I would suggest using a moisturizer with SPF in it which helps prevents wrinkles. Don’t skip this step.

My suggestions: Aveeno makes a great moisturizer. Here are a few more products I think are worth mentioning:

  • Coconut oil: One of the best beauty secrets. The best way to use coconut oil is at night. Before going to bed, rub a small amount of coconut oil in your fingers to warm it up and then massage it on your face. It is an all-in-one makeup remover, facial cleanser, and moisturizer.

Do not be worried about it leading to breakouts, just be sure to rinse it off well. 90% of the coconut oil will come off, and 10% will moisturize your skin all night long, which is what you want. After rinsing, you can add a bit more to the eye area as an eye cream.
If you want an added reassurance that the coconut oil won’t break your skin out, here’s what to do: add two drops of tea tree oil to the dab of coconut oil in your hand and mix it together before applying it.

  • Vaseline: The best (and cheapest) lip balm.

That basically says it all. I use this all the time, and apply it to my lips throughout the day. You can easily use it as a lip scrub by mixing a small amount of Vaseline with some brown sugar and rubbing it on your lips. Rinse off afterwards. This will remove all the flaky skin off your lips.

You might think that this skincare routine is too simple for your skin, especially if you are battling acne. But for 90% of you, this routine will work. The key is consistency. The fact is that if you are very consistent with taking care of your skin, your face will look a lot better than if you occasionally apply whatever acne treatments you have. Be consistent and you will see results. For those of you with more severe skin issues, I recommend that you see a dermatologist to help you out.

Photograph by Rivka Bauman Photography

Posted on

The Perfect Long Lasting Red Lip Tutorial

One of my favorite makeup looks in the winter is red lips. When I got married right in middle of the winter, I immediately decided that it was the makeup look I wanted for my wedding.

Lonlasting1

One thing I was worried about was my lipstick. How would I get it to last without smudging or coming off for my entire wedding? Well, my makeup artist told me what she doing as she was doing it, and told me the lipstick would last the entire night.

It did. It lasted the entire wedding – around 12 hours total until I wiped it off. The lipstick I wore was Mac, but I have since tried this same method with cheaper brands and it worked just as well.

Here’s how to make lipstick last:

Preparation: Before applying your lipstick, you need to prep your lips.

Longlasting 2

  • Apply any lip balm to your lips and massage them lightly.
  • If you have extra skin, use a clean toothbrush and rub your lips.
  • Apply a translucent powder as a lip primer.

Applying lipstick:

Longlasting 3

  • Line your lips carefully with a red lip pencil. If you don’t have red, a nude one will work as well.
  • Fill in the rest of your lips with the same lip pencil.
  • Apply your lipstick.

To finish:

Longlasting 4

  • Apply a second coat of lipstick using a lip brush.
  • Blot your lips using a tissue.
  • Apply the same translucent powder, this will prevent smudging.

You’re finished!

Longlasting 5

I know this seems like a lot of steps, but they work. You will be able to eat and drink and not have to worry about reapplying your makeup. Try it, you’ll see!

Posted on

Blue-Grey Eyeshadow

The look I have for you today is inspired by the rainy/snowy weather we have been experiencing, here on the East Coast. It is dark, smoky, and really beautiful, perfect for a night out!


The blue eye shadow goes perfectly for those of you with brown eyes. If your eyes are green, switch the blue for a dark maroon/purple. If your eyes are blue, switch the blue for a dark brown.

Tutorial:

  1. After priming your eyelids, apply a bright silver eye shadow to the inner corner of your eyes.
  2. Apply shiny gray eye shadow to the middle part of your eyelids.
  3. Apply a dark blue eye shadow to the outer corners of your eyes. Use a small precise brush to do steps 1-3.
  4. Apply a light neutral eye shadow (foundation powder) under your eyebrows and right above the crease. You can use a bigger, softer brush for this.
  5. Apply black eyeliner in your waterline and wing it out. I used a gel eyeliner and a thin eyeliner brush for this.
  6. Finish off the eyes by applying mascara. You are now finished your eyes!

I kept the rest of the face very neutral, without even applying any foundation or blush, and applied some natural lip gloss on my lips.

Stay warm and enjoy your night out in the town!

Posted on

Everyday Makeup Routine

Putting on makeup daily does not have to take up a lot of time; in fact you don’t even need more than five minutes. This makeup look is quick and easy, and will fit perfectly into everyone’s morning routine.

Here is a step by step tutorial:

1) Apply a moisturizing face primer all over your face, including your eyelids. If you don’t have any, use a regular facial moisturizer. It’s also a good idea to use one with SPF. You can use your fingers to apply.

2) Apply a neutral light brown eyeshadow to your eyelids. If you don’t have any, you can use foundation powder. The best way to apply it is with a small eyeshadow brush. However, if you don’t have one, you can use your fingers.

3) Apply a slightly darker brown eyeshadow in the crease right above your eyelids. You can use regular bronzer.

4) Apply black or brown eye liner right above your upper lashes. You can play around with different colors that complement your eyes. I’m using black. If you are a beginner, apply the eye liner very slowly and carefully. Practice makes perfect.

5) This step is optional; I like the look of it a lot. Smudge the eyeliner to give a softer look. If there is no ‘smudger’ on your eyeliner, you can use a Q-tip.

6) Apply mascara.

7) Apply Vaseline on your lips. If you want, you can apply lipstick, as I am in the picture.

It’s a good idea to let your skin breathe and not apply liquid foundation every day. Personally, I don’t have the patience; therefore I almost never wear it. However, if you wanted to, I would suggest applying it sparingly, using a sponge.

Yes, it really is that simple! It’s subtle makeup that will really make a difference. You won’t look ‘done’, you’ll just look refreshed 😉